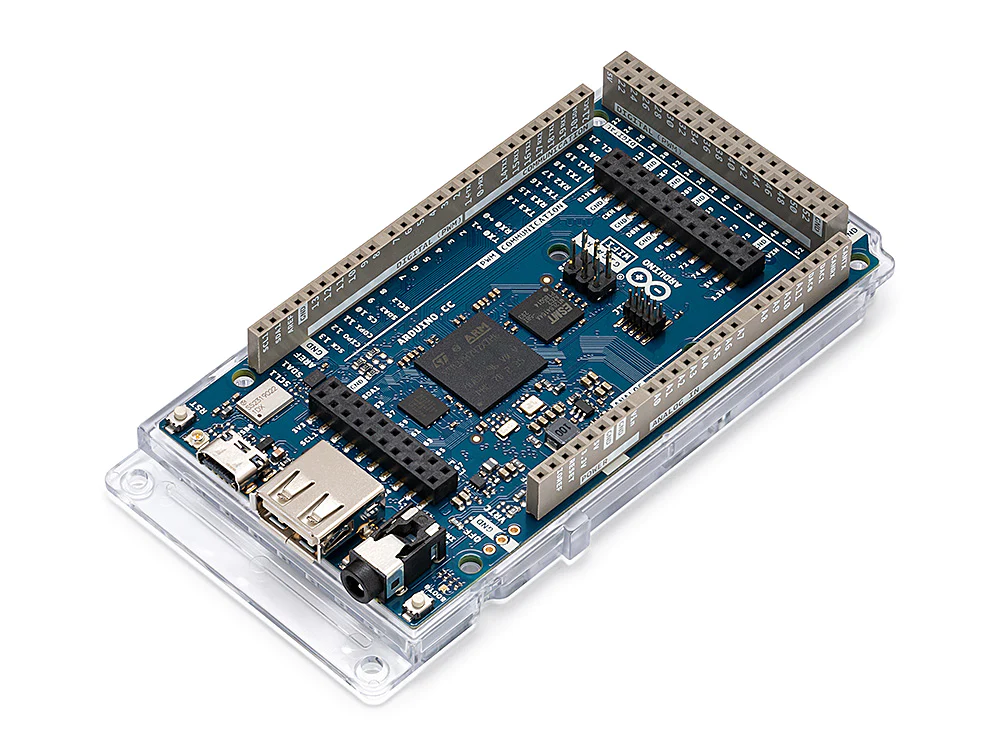
Arduino recently launched a new product named “GIGA R1 WiFi”, designed for ambitious makers and creators who want to take their projects to the next level. The GIGA R1 WiFi is an advanced version of the popular Mega and Due. It packs advanced features into an accessible component, making it easier for beginners and experts alike to create complex projects. This article will explore the powerful features of the GIGA R1 WiFi, including its microcontroller, wireless communication, hardware ports and communication, GPIOs and extra pins, connectors, and higher voltage support.
Microcontroller (STM32H747XI)
The GIGA R1 WiFi comes with a dual-core 32-bit microcontroller, STM32H747XI, allowing two brains to talk. It has a Cortex-M7 at 480 MHz and a Cortex-M4 at 240 MHz, making it faster and more powerful than its predecessors. You can even run micropython in one core and Arduino in the other, giving you the best of both worlds. The STM32H747XI has 2MB Flash and 1MB RAM, making it perfect for running complex applications.
Wireless Communication (Murata 1DX)
The GIGA R1 WiFi supports both Wi-Fi and Bluetooth, thanks to its Murata 1DX dual Wi-Fi 802.11b/g/n 65 Mbps and Bluetooth module. This makes it easy to connect to the Arduino IoT Cloud and keep track of your project remotely. If you are concerned about the security of the communication, the ATECC608A keeps everything under control. With the GIGA R1 WiFi, you can quickly connect to any wireless network and start working on your project.
Hardware Ports and Communication
The GIGA R1 WiFi has four UARTs (hardware serial ports), three I2C ports (one more than its predecessors), two SPI ports (one more than its predecessors), and one FDCAN. This means you can connect various sensors and devices to the board and control them directly from your code. The GIGA R1 WiFi’s hardware ports and communication options are perfect for makers who want to create complex projects.
GPIOs and Extra Pins
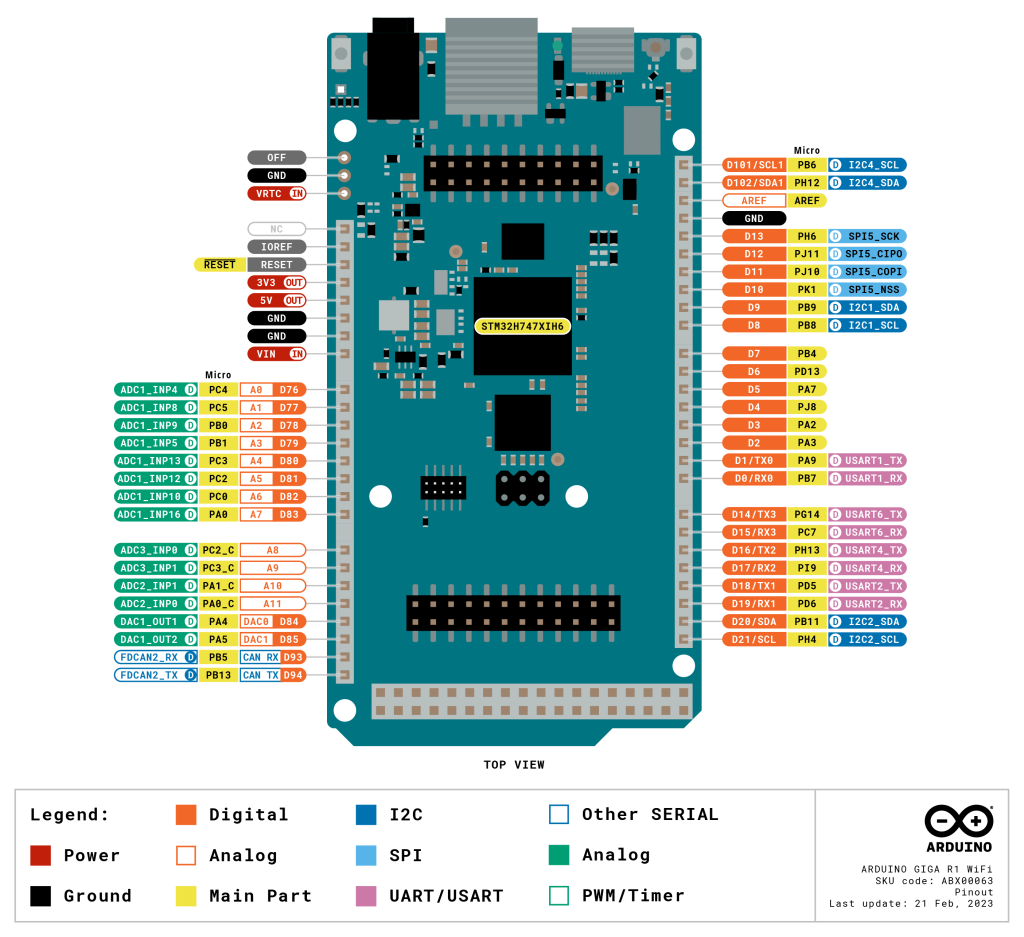
The GIGA R1 WiFi has 76 GPIO pins, and you can access them from underneath. The board has the same form factor as the Mega and the Due, so you can easily adapt your custom-made shields to the GIGA R1 WiFi (remember this board works at 3.3V though!) and we added extra headers to access extra pins. The GIGA R1 WiFi also has two new pins: a VRTC so you can connect a battery to keep the RTC running while the board is off and an OFF pin so you can shut down the board.
Connectors
The GIGA R1 WiFi has extra connectors on board that will facilitate the creation of your project without any extra hardware. This board has a USB-A connector suitable for hosting USB sticks, other mass storage devices, and HID devices such as a keyboard or mouse. It also has a 3.5mm input-output jack connected to DAC0, DAC1, and A7. The GIGA R1 WiFi has a USB-C to power and program the board and simulate an HID device such as a mouse or keyboard. It also has a Jtag connector, 2×5 1.27mm, and a 20-pin Arducam camera connector.
Higher Voltage Support
Compared with its predecessors that support up to 12 volts, the GIGA R1 WiFi can handle a range of 6 to 24 volts. This means you can use it with a wider range of power.
Connectivities
The GIGA R1 WiFi offers a wide range of connectivity options, making connecting to other devices and communicating with them easier. Here are some of the connectivity options available with the GIGA R1:
Wireless Connectivity:
The GIGA R1 WiFi comes with a Murata 1DX dual Wi-Fi 802.11b/g/n 65 Mbps and Bluetooth module, allowing you to connect to a Wi-Fi network or use Bluetooth to communicate with other devices. This is particularly useful for IoT (Internet of Things) projects where the device must communicate wirelessly with other devices.
Wired Connectivity:
The GIGA R1 WiFi offers several options for wired connectivity as well. It has four UARTs (hardware serial ports), three I2C ports, and two SPI ports, making it easy to connect to a wide range of sensors, displays, and other devices. It also has an FDCAN port for connecting to CAN (Controller Area Network) devices.
USB Connectivity:
The GIGA R1 WiFi has two USB ports: USB-C and USB-A ports. The USB-C port is used for programming, serial communication, and 5V power. The USB-A port is a USB host and can connect USB storage devices or HID (Human Interface Device) devices like a keyboard or mouse.
Camera Connectivity:
The GIGA R1 WiFi has a 20-pin Arducam camera connector, making it easy to connect a camera module to the board. This is particularly useful for projects that require image or video capture.
Audio Connectivity:
The GIGA R1 WiFi has a 3.5mm input-output jack connected to DAC0, DAC1, and A7. This makes it easy to add audio input or output to your project.
JTAG Connectivity:
The GIGA R1 WiFi has a Jtag connector, 2×5 1.27mm, which allows you to connect to the board using a JTAG interface. This is useful for debugging and programming the board.
In summary, the GIGA R1 WiFi offers a wide range of connectivity options, making it easy to connect to other devices and communicate with them. Whether you need wireless, wired, USB, camera, audio, or JTAG, the GIGA R1 WiFi has got you covered.
GIGA as an IoT gateway
The GIGA R1 WiFi can be also used as a gateway in an IoT project. A gateway is a device that connects different IoT devices and sensors to a network or the internet. The GIGA R1 WiFi can act as a gateway, allowing other IoT devices to connect to the network or the internet via Wi-Fi or Bluetooth.
Here is an example of how you can use the GIGA R1 WiFi as a gateway in an IoT project:
Let’s say you have several IoT devices in your home, such as smart lights, a thermostat, and a security camera. You want to be able to control these devices from your smartphone, even when you are not at home.
First, you would connect all your IoT devices to the GIGA R1 WiFi board via their respective interfaces, such as UART, I2C, SPI, or CAN. You can then program the GIGA R1 WiFi board to bridge these devices and the internet.
Next, you would connect the GIGA R1 WiFi board to your home Wi-Fi network or a cellular network using the Murata 1DX dual Wi-Fi 802.11b/g/n 65 Mbps and Bluetooth module. This would allow the GIGA R1 WiFi board to communicate with your smartphone or other devices over the internet.
Finally, you can create a mobile app or web interface that allows you to control your IoT devices remotely. This app or interface would communicate with the GIGA R1 WiFi board over the internet, which would in turn send commands to the respective IoT devices to control them.
With the GIGA R1 WiFi acting as a gateway, you can easily control your IoT devices remotely, even when you are away from home. This example demonstrates the versatility and power of the GIGA R1 WiFi in IoT projects.
GIGA R1 as an IoT end node
The GIGA R1 WiFi can be used as an IoT end node, which is a device that collects and sends data to a gateway or a cloud server. An end node typically has sensors or other devices that collect data and transmit it to the gateway. In contrast, a gateway is a device aggregating data from multiple end nodes and sending it to a cloud server or another gateway.
Here’s an example of how you can use the GIGA R1 WiFi as an IoT end node:
Let’s say you want to monitor the temperature and humidity in a greenhouse. You can use the GIGA R1 WiFi board as an end node to collect sensor data and transmit it to a gateway or a cloud server.
First, you would connect temperature and humidity sensors to the GIGA R1 WiFi board using the available GPIO pins or the hardware ports and communication interfaces. You can use sensors communicating over I2C, SPI, or other interfaces.
Next, you can program the GIGA R1 WiFi board to read the data from the sensors at regular intervals and transmit it to a gateway or a cloud server. You can use the Wi-Fi or Bluetooth module to send the data.
Finally, you can set up a gateway that collects data from multiple end nodes and sends it to a cloud server for storage and analysis. The gateway can connect to the internet via Wi-Fi, Ethernet, or other communication interfaces.
With the GIGA R1 WiFi acting as an end node, you can easily collect sensor data and transmit it to a gateway or a cloud server. This example demonstrates the flexibility and power of the GIGA R1 WiFi in IoT projects.
Conclusion
In conclusion, the Arduino GIGA R1 WiFi is an advanced development board that provides a powerful platform for makers, artists, and sound designers to bring their projects to life. With its dual-core microcontroller, wireless communication capabilities, secure element, and wide range of hardware ports and communication options, the GIGA R1 offers a range of possibilities for advanced projects. Its compatibility with the Arduino IoT Cloud and ability to act as a gateway in IoT projects makes it a versatile and valuable tool for developers. Additionally, its ability to interact with digital and analog sensors and record and play back audio provides added functionality for projects that require these features. Overall, the GIGA R1 is an affordable and accessible option for those looking to step up their game and take their projects to the next level.
A presto